How to Use an Exhaust Pipe Tube Bender
When it comes to automotive repairs, custom exhaust systems, or even industrial piping projects, an exhaust pipe tube bender is an indispensable tool.

Types of Exhaust Pipe Tube Benders: Which One Suits Your Needs?
Before diving into how to use an exhaust pipe tube bender, it’s important to understand the different types available.
Hydraulic Exhaust Pipe Tube Benders
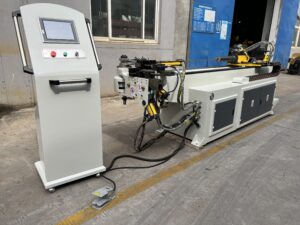
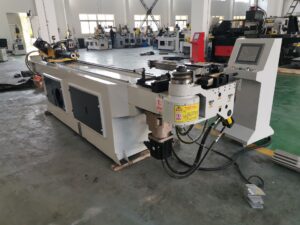
Hydraulic benders use hydraulic pressure to bend pipes, making them easier to operate and capable of handling thicker, larger pipes. They are commonly used in professional workshops where speed and precision are critical.
CNC Exhaust Pipe Tube Benders
CNC (Computer Numerical Control) benders are advanced, automated machines used in industrial settings.
Understanding the type of exhaust pipe tube bender you’re working with is the first step to achieving great results. For most DIY and small-scale projects, a manual or hydraulic bender will suffice.
Step-by-Step Guide: How to Use an Exhaust Pipe Tube Bender
Now that you’re familiar with the types of exhaust pipe tube benders, let’s walk through the process of using one. Follow these steps to ensure smooth, accurate bends every time.
Step 1: Prepare Your Materials and Tools
Before you begin, gather all necessary materials:
- The exhaust pipe (ensure it’s the correct size and material for your bender).
- The exhaust pipe tube bender (manual, hydraulic, or CNC, depending on your needs).
- Measuring tools (tape measure, angle finder, or protractor).
- Marker or chalk for marking bend points.
- Safety gear (gloves, goggles, and protective clothing).
Ensure the pipe is clean and free of debris, as dirt or rust can affect the bending process.
Step 2: Measure and Mark the Bend Points
Precision is key when using an exhaust pipe tube bender. Measure the exact location and angle of the bend you need. Use a marker or chalk to clearly mark the start and end points of the bend.
Step 3: Set Up the Exhaust Pipe Tube Bender
Depending on the type of bender you’re using, follow these setup steps:
- For manual benders, secure the tool to a stable surface or workbench.
- For hydraulic benders, ensure the hydraulic system is functioning properly and the pressure is set correctly.
- For CNC benders, input the bend specifications into the machine’s control panel.
Insert the pipe into the bender, aligning the marked bend point with the bending die.
Step 4: Perform the Bend
Slowly and steadily apply pressure to bend the pipe. For manual benders, use consistent force to avoid kinks. For hydraulic benders, activate the hydraulic system and monitor the bend angle. For CNC benders, the machine will handle the bending process automatically.
Stop bending once you reach the desired angle. Use an angle finder to confirm accuracy.
Step 5: Inspect the Bend
After bending, carefully inspect the pipe for any signs of damage, such as kinks, cracks, or deformities. A high-quality exhaust pipe tube bender should produce smooth, uniform bends. If the bend is imperfect, you may need to adjust your technique or use a different tool.
Step 6: Repeat for Additional Bends
If your project requires multiple bends, repeat the process for each one. Take your time to ensure accuracy, as rushed bends can lead to errors.
Common Mistakes to Avoid When Using an Exhaust Pipe Tube Bender
Even experienced users can make mistakes when using an exhaust pipe tube bender. Here are some common pitfalls and how to avoid them:
1. Incorrect Pipe Measurements
Failing to measure accurately can result in bends that don’t fit your project. Always double-check your measurements before bending.
2. Using the Wrong Bender for the Pipe
Not all exhaust pipe tube benders are suitable for every pipe size or material. Check the bender’s specifications to ensure compatibility.
3. Over-Bending or Under-Bending
Bending too far or not far enough can ruin the pipe. Use an angle finder to monitor the bend angle and stop at the desired point.
4. Ignoring Safety Precautions
Working with metal pipes and heavy tools can be dangerous. Always wear protective gear and follow safety guidelines to avoid injuries.
Tips for Achieving Perfect Bends with an Exhaust Pipe Tube Bender
To get the most out of your exhaust pipe pipe bender, keep these tips in mind:
1. Use Lubrication
Applying a small amount of lubricant to the pipe can reduce friction and make bending smoother. This is especially helpful for thicker or harder pipes.
2. Practice on Scrap Pipe
If you’re new to using an exhaust pipe tube bender, practice on scrap pipe first. This allows you to get a feel for the tool without wasting valuable materials.
3. Maintain Your Bender
Regularly clean and inspect your exhaust pipe tube bender to ensure it’s in good working condition. A well-maintained tool produces better results and lasts longer.
4. Choose the Right Pipe Material
Different pipe materials (e.g., stainless steel, mild steel, aluminum) behave differently when bent. Research the best bending techniques for your specific material.
Case Study: Custom Exhaust System for a Classic Car
To illustrate the importance of using an exhaust pipe tube bending effectively, let’s look at a real-world example.
Background
John, a classic car enthusiast, wanted to restore a 1965 Ford Mustang and install a custom exhaust system. The original exhaust pipes were rusted and poorly fitted, so John decided to create a new system using stainless steel pipes for durability and performance.
Challenge
The Mustang’s undercarriage had limited space, requiring precise bends to fit the exhaust system without interfering with other components. John needed an exhaust pipe tube bending that could handle stainless steel and produce smooth, accurate bends.
Solution
John opted for a hydraulic exhaust pipe tube bending, as it offered the power and precision needed for stainless steel. He measured the required bend angles and marked the pipes carefully. Using the hydraulic bender, John created smooth, kink-free bends that fit perfectly within the Mustang’s design.


