How Does an Exhaust Pipe Tubing Bender Work?
If you’re in the automotive or mechanical repair field—or even if you’re a dedicated DIY enthusiast—chances are you have come across the term exhaust pipe tubing bender. Whether you’re customizing your vehicle’s exhaust system for better performance or fabricating a unique setup, understanding how an exhaust pipe tubing bender works is central to achieving smooth, accurate bends without compromising the strength or flow of the pipe. In this comprehensive guide, we will delve into the core principles of exhaust pipe bending, explore the different types of benders, highlight important considerations for successful bending operations, and conclude with a real-life case study that illustrates these concepts in action.
1. The Purpose and Importance of an Exhaust Pipe Tubing Bender
Modern vehicles rely on exhaust systems not just for noise management but also for efficient expulsion of exhaust gases, improved engine performance, and optimized fuel economy. The exhaust pipe tubing bender is a specialized tool designed to shape pipes—typically made from steel, stainless steel, or aluminized metal—into precise angles and bends.
- Maintaining Exhaust Flow Properly bent exhaust tubing ensures unrestricted flow of gases, which can improve engine efficiency and reduce backpressure. Bends that are too sharp or crushed can impede airflow, leading to reduced performance and potential damage to engine components over the long term.
- Making Custom Systems Possible Performance enthusiasts and custom car builders frequently need deviating curves, additional length, or repositioned exhaust tips for aesthetic or practical reasons. A reliable tubing bender makes these modifications viable without resorting to cumbersome pre-fabricated pieces.
- Preserving Structural Integrity Using an exhaust pipe tubing bender helps avoid crimping and flattening the pipe, ensuring the tubing maintains its circular cross-section. Any deformation can weaken the material, create leaks, or compromise the exhaust’s structural integrity.
2. Basic Principles of Exhaust Pipe Bending
To understand how an exhaust pipe tubing bender works, it’s essential to grasp the fundamentals of metal deformation. When you bend a metal tube, one side stretches while the opposite side compresses. The goal is to achieve a clean, uniform bend with minimal distortion.
Neutral Axis Inside the wall of the pipe is the “neutral axis,” an imaginary line where the material switches from tension (on the outer bend) to compression (on the inner bend). A precise bend keeps this axis intact, minimizing stress on the pipe.
- K Factor and Bend Allowance Manufacturers and fabricators often use formulas—like the K factor and bend allowance—to calculate how much material is needed for the intended bend. While this is more specialized for intricate industrial designs, a fundamental understanding helps in achieving repeatable, accurate bends.
- Springback Metal pipes exhibit “springback,” meaning they tend to revert slightly after being bent. Knowing the springback characteristics of the metal allows operators to adjust the bend angle accordingly, ensuring the pipe reaches its intended final angle.
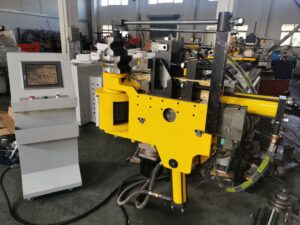
3. Key Components of an Exhaust Pipe Tubing Bender
Although designs vary across different brands and models, most exhaust pipe tubing benders share core components:
- Form Die or Shoe The form die (sometimes referred to as the bending shoe) is shaped to match the outer diameter of the pipe. A high-quality form die is crucial in preventing ovaling or crimping.
- Follower Block This block applies resistance on the other side of the pipe, guiding it against the form die. Proper alignment between the form die and follower block is crucial for smooth bends.
- Clamp or Locking Mechanism To keep the pipe stable, a clamp or locking arm holds the pipe firmly against the bending die. This prevents slippage that could result in inaccurate angles or damaged material.
- Leverage Arm or Hydraulic Ram Some exhaust pipe tubing benders are manual, using a long lever arm to generate bending force. Others are hydraulic or even electric-hydraulic, greatly reducing the manual effort required.
- Angle Indicators or Degree Dial Most tubular benders include a degree wheel or angle indicator, allowing for precise measurement of the bend angle. Operators can set or confirm the desired bend angle before applying force.
4. Different Types of Exhaust Pipe Tubing Benders
4.1 Manual Lever Benders
Commonly used in small workshops or for on-the-go tasks, manual lever benders rely on arm strength and leverage. They are cost-effective and suited for lighter gauge pipes, but can be challenging for sturdier materials or large-diameter tubes.
4.2 Hydraulic Benders
Hydraulic exhaust pipe tubing benders use a pressurized fluid system to apply force. They generally come with a hydraulic cylinder and a pump (manual, air-driven, or electric) for exerting significant bending pressure with less physical effort. They are a staple in professional automotive shops.
4.3 Mandrel Benders
A mandrel bender uses a flexible rod or series of ball bearings inserted into the pipe, supporting the inside radius during bending. This method minimizes ovaling and wrinkling, making it ideal for performance exhaust systems or applications requiring tight radii.
5. Step-by-Step Guide: How an Exhaust Pipe Tubing Bender Works
Below is a simplified outline of what happens when you use a typical exhaust pipe tubing bender (hydraulic or manual):
- Preparation and Measurement
- Measure the pipe to determine where the bend should start.
- Mark the center of the bend.
- Calculate the required bend radius or consult bending charts, such as the standard radius for your die.
- Setup
- Insert the pipe between the forming die and the follower block.
- Tighten the clamp or locking mechanism to ensure the pipe doesn’t shift.
- Align Bending Marks
- Line up your bend mark with the reference point on the die or bender.
- Verify the pipe’s orientation so that any additional bends or angles remain consistent.
- Apply Force
- With a manual lever bender, gradually pull on the leverage arm until you near the desired angle.
- For a hydraulic system, engage the pump to drive the hydraulic ram, which then pushes or pulls the pipe against the die.
- Check Angle and Springback
- Release the pressure slightly to see the final angle.
- Use the angle indicator (or a protractor) to confirm.
- If the bend is slightly less than you require, apply a bit more force or compensate for anticipated springback.
- Remove the Pipe
- Loosen the clamp and carefully withdraw the bent pipe from the machine.
- Inspect the bend’s outside radius for signs of rippling or ovaling.
- Deburr and Finish
- Smooth out any sharp edges where the pipe was cut.
- If needed, polish or coat the pipe to prevent corrosion, especially in high-heat scenarios like exhaust systems.
6. Critical Factors Affecting Bending Quality
6.1 Material Choice
Different metals have distinct tensile strengths and springback properties. Stainless steel often requires more pressure and careful calculation of springback, while mild steel can be more forgiving.
6.2 Bend Radius
The bend radius determines how tight the curve is. Tighter bends might require special tooling or mandrel support to prevent collapsing. Larger radii are easier to achieve with minimal distortion.
6.3 Wall Thickness
A thicker pipe wall can withstand more compression and tension without wrinkling. Thin-walled pipes bend more easily but are also more prone to deformation, flattening, or cracks if not handled carefully.
7. Safety Measures and Best Practices
Working with high-pressure equipment and metal parts always warrants caution. Here are some guidelines:
- Wear Protective Gear Safety glasses, gloves, and sturdy footwear protect against hot metal shards or sudden pipe movements.
- Secure Your Work Area Clear the surrounding space of clutter. Keep a designated area to support the pipe so it doesn’t swing or cause collisions.
- Check Equipment Regularly Inspect the bender’s hydraulic components, lever arms, and pivot points for wear or damage. A malfunctioning bender can lead to severe accidents.
- Mind the Pinch Points Benders can create powerful pinch points. Always keep hands and body parts away from moving parts during the bending process.
- Follow Manufacturer’s Instructions Each bender has unique specifications regarding angle limits, pipe diameters, and recommended hydraulics pressure. Overstepping these guidelines can damage both the pipe and the machine.
8. Real-World Case Study: Custom Exhaust for a Classic Muscle Car
Scenario: Jake, an automotive enthusiast, wanted to upgrade the exhaust system of his 1969 classic muscle car. He desired a dual-exhaust setup with a moderate performance muffler and slightly larger pipe diameter than stock. However, standard off-the-shelf exhaust kits were either too costly or didn’t match the specific alignment he needed. He decided to fabricate his own system using an exhaust pipe tubing bender.
Step 1: Planning and Measurements Jake jacked up the car and measured the distance from the exhaust headers to the rear bumper. He noted down potential obstacles like the transmission crossmember and the rear axle. His plan involved bending two 2.5-inch stainless steel tubes to clear suspension components gracefully.
Step 2: Preparing the Bender Jake invested in a mid-range hydraulic exhaust pipe tubing bender fitted with a 2.5-inch form die. Before bending, he tested a smaller diameter mild steel pipe, getting a feel for the bender’s operation and measuring the approximate springback.
Step 3: First Bends He started with a 45° bend near the headers. Carefully aligning the pipe in the bender, he applied hydraulic pressure steadily. After releasing and measuring, Jake noticed a 3° springback, which he compensated for on the next bend by slightly over-bending.
Step 4: Complex Alignment For the clearance around the transmission crossmember, Jake required a compound bend—one bend at 30° and another at 20° in a different plane. He used an angle finder to mark each bend location, carefully rotating the pipe so that both bends remained on the correct axes.
9. Troubleshooting and Common Mistakes
- Pipe Slips in the Bender
- Tighten all clamps or locking arms.
- Check if the pipe’s diameter matches the die specifications.
- Consider using a textured clamp surface.
- Crushing or Flattening
- Select the correct bend radius for the diameter and wall thickness.
- Use a mandrel bender if extreme angles are needed.
- Slow down the bending process and apply even pressure.
Click for more detailed information.


